chester's blog

technology, travel, comics, books, math, web, software and random thoughts

Atari 2600 on a breadboard, part III: tidying up and adding the TIA (video chip)

25 Jun 2021

Tidying Up

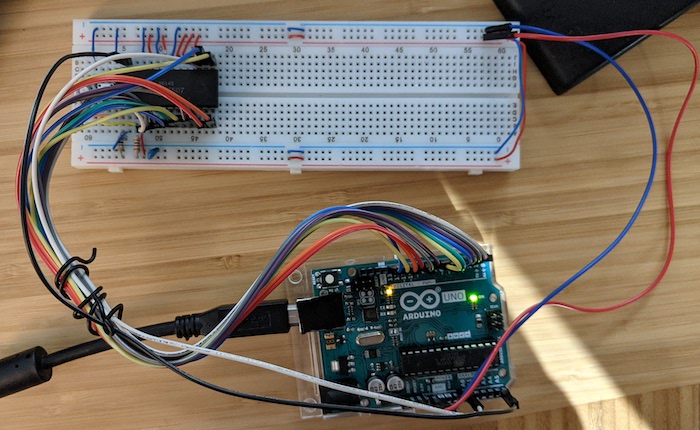
In the previous posts I made the CPU work on the breadboard, then added a cartridge connector, all using jump wires - which can be easily reconnected, labeled, etc., but have a downside: they disconnect easily. Coupled with the equally flimsy cart connector, all my attempts at moving on with the project would result in failures.

After seeing Ben Eater’s beautiful breadboard computers I decided to rewire the boards I already had. For that, I’d have to rethink my cartridge connector: instead of having the jumper cables going out of it (left), I got some long pin female headers that extended the pins so the connector now fits the board like any other chip (right):

cart, before and after

Atari 2600 on a breadboard, part II: reading a cart

14 Feb 2021

Previously…

A long time ago I grabbed the three chips from a broken Atari 2600 (Jr.), to see if I could build an Atari with them on a solder-less “breadboard”. My first attempt (post here) was to drive the CPU with an Arduino, which showed the chip advancing through what it believes to be memory, but is actually just a single “no operation” (NOP) hard-wired instruction:

cleaner version of the 6507 memory walk on a breadboard

It took some time (between finding the right connector, 3D-printing a part, figuring out the wiring and fixing the Arduino software), but I finally moved on to the next step: plugging a real Atari cart and seeing some actual code running!

Building a classic XBox to USB adapter (to use a RedOctane Ignition DDR mat to a computer)

19 Jul 2020

As a Dance Dance Revolution (DDR) enthusiast on its heyday, I spent a lot of time adapting dance pads to improve comfort and durability, until I got myself an Ignition pad. Its thick rubber interior, superior sensors and RedOctane (of Guitar Hero fame) quality resulted in no mis-/over-/continued registering of arrows, less knee strain and happier downstairs neighbours.

My Ignition pad from the 2000s

I sold that one years ago, but having some floor space and time now, I decided to buy a “new” one on eBay. Not having a Playstation these days, I planned to use Stepmania (the open-source DDR clone), but my mat was missing the USB adaptor. A Playstation-to-USB one gets recognized, but arrows do not register correctly.

The adaptor I needed would plug in the XBox connector (classic XBox controllers are quite close to USB in nature, as we’ll see below). They are near-impossible to find, but it seems the breakaway cable that came with the controller can be converted into such an adaptor.

Detecting TV power state via USB

03 Jun 2020

One convenient feature of Chromecast is that it turns on your TV automatically when you connect to it - as long as your TV has HDMI-CEC. Mine doesn’t, but it is already remote-controlled via Raspberry Pi, and thanks to Home Assistant, I can easily detect when the Chromecast is in use, so in theory I could just blast a command to the IR when it switches away from “off”.

There is just one problem: Home Assistant doesn’t know whether the TV is on or off. If it is already on when I start casting, sending the command will turn it off - the opposite of what I want. Also, I would like to turn the TV off when not using the Chromecast (something it doesn’t seem to do, even with HDMI-CEC).

ZX Spectrum Next

25 Apr 2020

The ZX Spectrum Next was a Kickstarter-backed initiative aiming to recreate the iconic ZX Spectrum using FPGA and lots of ingenuity. I am a bit too Marie-Kondo-ed for physical retrocomputing these days, and, on top of that, have been skeptical of such projects (for good reasons).

However, this one had names like Victor Trucco (one of the most respected Brazilian retrocomputing hackers) and Rick Dickinson (industrial designer behind several Sinclair computer cases, who sadly passed away before it was finished) behind it, so in May 2017 I gave it a shot and backed the campaign in exchange for a unit.

Expected to ship January 2018, it was delayed for more than two years, but for good reasons: the people behind the project would not accept anything but the best quality, continuously pressuring manufacturers to go on-spec. And it was worht the wait - the computer is sturdy and gorgeous:

click to enlarge

Enable dynamic DNS (DynDNS, Duck DNS, etc.) inside networks without NAT loopback support on router

18 Aug 2019

Dynamic DNS providers like DynDNS or Duck DNS are great to let you access software like Home Assistant running on your properly secured computer or Raspberry Pi from anywhere.

One problem that I was having with them: the custom URL did not work inside my network, just outside. That happens because my router does not support NAT loopback, blocking any requests from the internal network to the external IP (which is what my custom domain points to).

(Cheap) 433Mhz Leak Detectors in Home Assistant via Arduino + OpenMQTTGateway (with Telegram alerts)

30 Jul 2019

Water incidents in a condo can be catastrophic, and surely things like shutting your main water valve when you go out for long periods and having the proper coverage in your insurance are important. But for added peace of mind, leak detectors aren’t a bad idea.

When I saw these $3 leak detectors on eBay, I decided to give them a shot. Not only for low price, but also because they used 433Mhz RF - the same tech I use to voice-control my lights from a Raspberry Pi.

Once they arrived, I ran RFSniffer and indeed, when they get wet, the Raspberry Pi prints a different value for each sensor - so it should be easy to wire up an alert system… right?

Fixing a loose Nintendo Switch Joy-Con

06 Jul 2019

The Nintendo Switch is surprisingly sturdy, but this is a common problem: joy-cons that still click (and oh, how I love that click) and snap to the console, but slide off when they shouldn’t (e.g., right in the middle of an online game match).

The cause is a plastic latch that erodes slightly with use (or maybe after it gets jammed on the backplate when you mis-connect it). There is a cheap replacement for that latch that you can order here.

The replacement latch is made of metal (which should have been Nintendo’s original choice), and several videos (like this one) show how to replace it. No soldering is required, just some careful screw removal and disassembly.

With the usual caveats (you do it on your own risk, it voids your warranty, etc.), here is how it went for me.

Using Ansible to configure a Raspberry Pi (Home Assistant, LIRC, 433Utils, Z-Wave, etc.)

13 Apr 2019

A while ago I built a couple inexpensive hacks that added voice-command to my tv and then to my lights using a Raspberry Pi, Google Home Mini, infrared and RF radio. Since then, I added other things, which prompted me to move the hacks into the popular Home Assistant home hub software.

With so much of my routine depending on that setup, backup became a concern. I’d make an occasional copy of the SD card with dd, but that isn’t a good long-term solution. Ideally, I wanted to rebuild my setup easily, should the card get corrupt, slow or just wrecked by my ongoing hacking.

Enter Ansible. Sysadmins use it to write “playbooks” that represent the changes they would manually apply to a server. If done right, such playbooks can be applied to an existing server (fixing any broken configs), or a brand new one (to recreate its services).

The Raspberry Pi is just a (tiny) server - meaning hobbyists can use Ansible as well!

I’m not an Ansible expert (there are better places to learn about it), but my Ansible configs and these notes may be useful for anyone interested in automating Raspberry Pi setups (for home automation or anything else).

Renovating an Atari 2600 (AV mod + capacitor/power adaptor replacement)

18 Feb 2019

A while ago I got this beautiful Atari 2600 all-black, 4-switch model - often nicknamed “Darth Vader”, for obvious reasons:

The console generates a TV signal, which the TV has to tune in just like a normal over-the-air channel. It was quite convenient at the time (and quality was good enough for the TV sets we had), but modern TVs show degradation - not to mention some can’t even pick up the faint signal - I had to hook mine to a VCR that would decode the signal into A/V.

That quirky setup led me to make the popular A/V conversion (“mod”) - and, while at it, replace the power adaptor (with one that I can actually keep on the wall without fear of burning down the house) and capacitors (something that should be done to any vintage electronics that you want to keep humming).