Water incidents in a condo can be catastrophic, and surely things like shutting your main water valve when you go out for long periods and having the proper coverage in your insurance are important. But for added peace of mind, leak detectors aren’t a bad idea.
When I saw these $3 leak detectors on eBay, I decided to give them a shot. Not only for low price, but also because they used 433Mhz RF - the same tech I use to voice-control my lights from a Raspberry Pi.
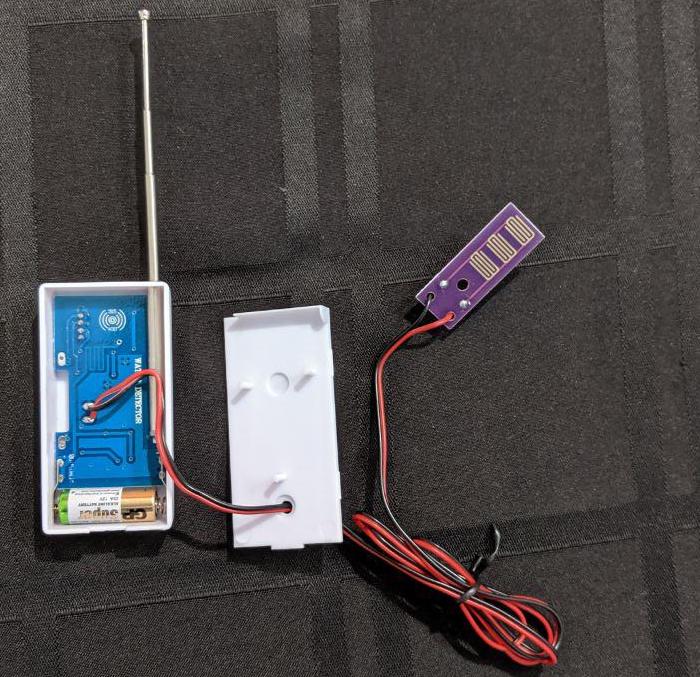
Once they arrived, I ran RFSniffer and indeed, when they get wet, the Raspberry Pi prints a different value for each sensor - so it should be easy to wire up an alert system… right?
MQTT
Well, it wasn’t. I found it odd that Home Assistant doesn’t have a 433MHz input integration (despite having a few for output). The reason is that “sniffing” from Raspbian can be clunky (you need a daemon running) and unreliable (due to its non-realtime nature).
technicalpickles suggested I should check out MQTT, so I did. It is a “publish/subscribe message transport” - something I’m familiar with (having worked with a few pub-sub systems, including the venerable IBM MQSeries from which the “MQ” in “MQTT” comes), but honestly, it felt like over-engineering at first.
Eventually, I realized it is more of a divide-and-conquer approach, with these parts:
- A “broker” software that sits in the middle of everything.
- A dedicated device that monitors the RF frequency and publishes events to this broker when a sensor “says” it’s wet.
- A Home Assistant integration that subscribes to these events and triggers automations to notify me.
Splitting things like that (and using MQTT as the glue) means I don’t have to write any new software:
- Mosquitto is an MQTT broker that runs on the Pi and requires no configuration at all.
- OpenMQTTGateway transforms Arduino-compatible devices in monitors for all sorts of inputs (including our 433Mhz RF), publishing their signals as MQTT events into a broker.
- Home Assistant has an MQTT integration that, once properly configured, consumes events from a broker and exposes them as sensors.
Assembling the monitor/publisher
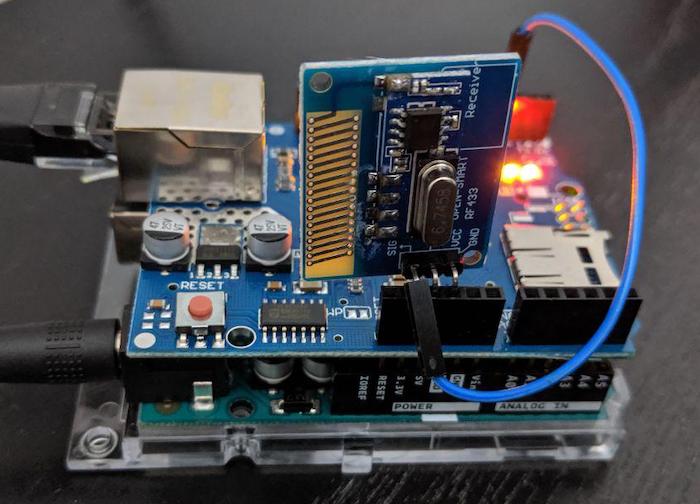
I got a new Arduino Uno for the project (my other Arduino clones/models lacked the memory requirements for OpenMQTTGateway). Since it needs to send the events to the network, I added an Ethernet Shield, and for RF I used my newest Long Range 433Mhz RF Receiver module. The long range and built-in antenna made this my receiver of choice over the more popular RF modules - and it’s just as cheap as those.
By bending the data output pin on the RF receiver a little bit, the receiver can be inserted directly on the shield, just matching the VCC and GND pins with 5V and GND on the board (respectively). The data pin can be then connected to Arduino digital input 3 with a small breadboard jumper wire.
The final result is a bit taller than I wished, but hey, no soldering required:
Mosquitto MQTT broker configuration
Assuming you are using Raspbian Buster or later, just log on the Pi and type:
sudo apt-get install mosquitto mosquitto-clients
and you are good. Seriously, that’s it.
Technically you just need the mosquitto package, but the other one allows you to test your installation by running:
mosquitto_sub -t \# -v
which prints all messages published to the broker. You can publish a message by opening a second terminal window and running a command like this:
mosquitto_pub -t "some/test/topic" -m "hi this is the message"
The first terminal will show some/test/topic hi this is the message, indicating hi this is the message was published under the topic some/test/topic.
OpenMQTTGateway configuration
This project’s wiki contains several configuration guides, including one for my setup, that is, an Arduino reading RF signals and publishing to a MQTT broker.
Here are the changes I made to User_config.h (after downloading the “CODE-“ release and moving the lib folder as explained on the wiki):
- After
DEFINE THE MODULES YOU WANT BELOW, uncomment (that is, remove the//from):
#define ZgatewayRF "RF" //ESP8266, Arduino, ESP32
-
Leave all other
##define Z...lines commented (with//). -
In the line
char mqtt_server[40] = "...", put the IP address of the Raspberry Pi (between the quotes). -
Replace the zeros in the line
const byte ip[] = { 0, 0, 0, 0 }; //ip adresswith an IP address for the Ethernet Shield that is compatible with the network (even though the comments say the software supports DHCP, it wasn’t working for me). -
IMPORTANT: Uncomment the line below so each sensor publishes events to a specific MQTT topic (instead of a single topic for all of them, which results in a barrage of
No matching payload found for entity: ... with state_topic: ...').
#define valueAsASubject true
Uploading a sketch with those changes will make the Arduino connect to your broker (Serial Monitor on the IDE will help you debugging; fiddle with baud speed until you see text instead of garbage).
If you still have mosquitto_sub -t \# -v open, you should see something like:
home/OpenMQTTGateway/LWT online
home/OpenMQTTGateway/version 0.9.1
and whenever a sensor gets wet:
home/OpenMQTTGateway/433toMQTT/VALUE {"value":VALUE,"protocol":...,"length":...,"delay":...}
where VALUE is (hopefully) unique for each of your sensor. In fact, you’ll see those events for all other things transmitting in the 433MHz frequency in your vicinity. I get a couple every minute in my apartment.
Home Assistant
First thing is to make Home Assistant aware of your new broker. You can do it on the UI (clicking on +, selecting “MQTT” and setting localhost as the broker address), or by adding to configuration.yaml:
mqtt:
  broker: localhost
That will make Home Assistant subscribe to the broker, but you need to expose the events. There are two ways:
- Use the MQTT Trigger and directly trigger actions when events for a specific topic (sensor) are published.
- Use the MQTT Binary Sensor to represent the actual state of the sensors in the UI.
The trigger was tempting for my goal (getting notifications on my computer/phone when a potential leak is detected), but putting the sensors in the UI allows for richer integrations with other elements in the home. It also allows configuring fine details - for example, defining that a sensor is “on” when you get the message, but only gets “off” after X seconds without a message, so I went with it.
Just add these values to configuration.yaml, one - session for each sensor (replacing “11111111”, “22222222”, etc. with the VALUEs from mosquitto_sub or RFSniffer):
binary_sensor:
  - platform: mqtt
    name: Washroom Leak Sensor
    payload_on: "11111111"
    value_template: "{{ value_json.value }}"
    off_delay: 10
    device_class: moisture
    state_topic: "home/OpenMQTTGateway/433toMQTT/11111111"
  - platform: mqtt
    name: Kitchen Sink Leak Sensor
    payload_on: "22222222"
    value_template: "{{ value_json.value }}"
    off_delay: 10
    device_class: moisture
    state_topic: "home/OpenMQTTGateway/433toMQTT/22222222"
  - platform: mqtt
    name: Some Other Leak Sensor
    ...
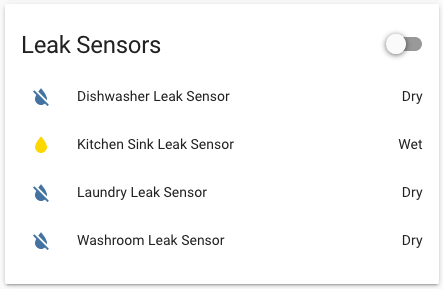
Once you restart, the sensors should be available in your Home Assistant main dashboard. I manually config mine, so I built a nice little card with them:
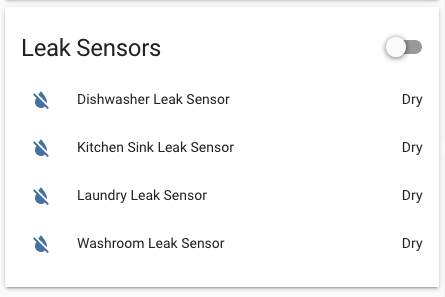
The page updates dynamically, so you should see them flip as you wet the sensors, then go back after 10s (or how long you set the off_delay above):
Notifications via Telegram
No one looks at a dashboard all the time (well, I don’t 😁), so we need a way to send notifications to my mobile phone. The Telegram integration is a great way to do it.
Just open BotFather on the app, send it a /newbot command to create a bot for you, and get its TOKEN. Send any message to the newly-created bot, then visit https://api.telegram.org/botTOKEN/getUpdates (replace TOKEN accordingly) to get the ID of your personal user for that bot.
Then add these lines to configuration.yaml, replacing TOKEN and ID with yours.
telegram_bot:
  - platform: polling
    api_key: TOKEN
    allowed_chat_ids:
      - ID
notify:
  - name: my_telegram
    platform: telegram
    chat_id: ID
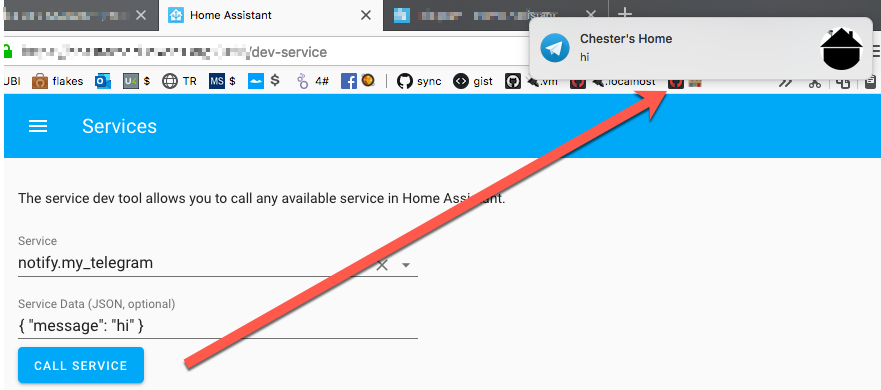
Another Home Assistant restart, and you should be able to send messages to your Telegram app by clicking on “Services” and calling notify.my_telegram with something like { "message": "hi" }. The result:
Wiring it all together
The grand finale: sending the notification when a sensor gets on (wet) or off (dry). Here is where Home Assistant shines - something like this in automations.yaml does the trick:
- alias: kitchen_sink_leak_sensor_state_change_alert
  trigger:
    platform: state
    entity_id: binary_sensor.kitchen_sink_leak_sensor
  action:
    service: notify.my_telegram
    data:
      message: "Kitchen Sink Leak Sensor is {{ states('binary_sensor.kitchen_sink_leak_sensor') }}"
Had to add one for each sensor, but it was worth it. Here is my phone, telling me I should check the pipes under my sink:
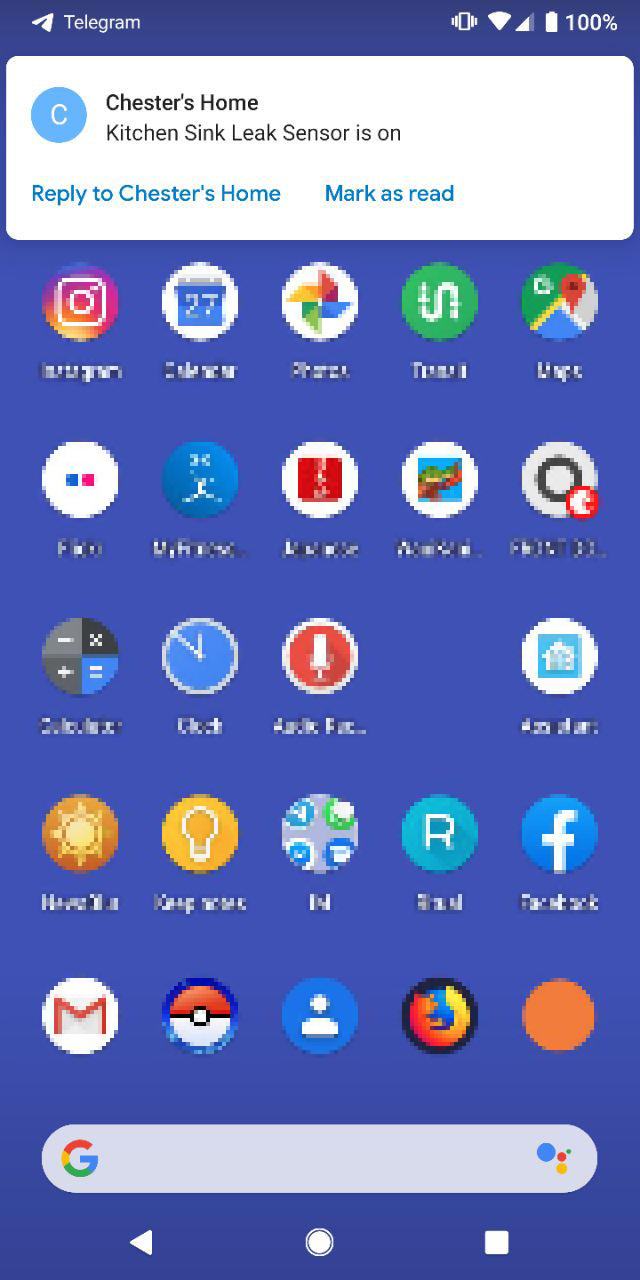
How cool is that? Not at all? Well… I find it cool. 🤓
Possible improvements
I’m quite happy with the results so far, but here are some things that could be improved:
- Maybe I could bend the two pins and keep the data one straight, fitting the RF module in parallel with the other boards and reducing the height. On the other hand, this mount keeps the antenna high… decisions, decisions. 🤔
- The sensors aren’t bad for their price, but I found that often batteries can get displaced (depending on how you hang the sensor’s main unit). If I keep working with those, I may consider some adaptation to the case (for now, some tape did the trick).
- The Arduino + Ethernet shield are a good option if you have them lying around. But an ESP8266 would likely be a better choice, with its built-in Wi-Fi, small size and ridiculous price.
- I use the Raspberry Pi to control my TV with an IR blaster and lights using 433MHz RF outlets, which require some software setup that often breaks as Raspbian and Home Assistant get updates. Maybe I could offload those functions to the Arduino (or ESP8266).
Comments
DangerD D
where I can get arduino sketch?
Barry
DangerD, Check out "OpenMQTTGateway configuration" section.
Thanks Chester, this article was the genesis of my OpenMQTTGateway-based security system.
chesterbr
Glad to hear! I've heard there are other software bundles these days to consider, and got particularly interested in ESPHome (https://esphome.io) for the easy Home Assistant integration, but OpenMQTTGateway has been so stable (other than restarting it from time to time; I only remember it exists when I need to add some other capability) that I'll resist to switching.
chesterbr
Sorry, somehow missed this Q. As Barry said, there are some links on the OpenMQTTGateway configuration section, but it seems the project disabled the wiki that had some schematics.
Good news is that the project documentation website has that info now. Specifically, https://docs.openmqttgatewa... shows how to wire both the transmitter and receiver to an Arduino. Good luck!