In the last post I described how I used an ESP8266 board to detect when my ancient doorbell rings, and trigger a notification on my phone. This time, I’m going to use the same board and a relay to unlock the front door, which, combined with the ring detection, will allow me to get deliveries past the front door, open it for visitors, and even unlock both that door and the internal one (which already has a smart lock) when I arrive home!

Relay Circuit vs Relay Shield
My front door is as old school as my doorbell: just an electric lock downstairs, and a button inside my house that opens it. The voltage/current there is certainly out of of what an ESP8266 GPIO pin can handle, so the solution is to connect a relay to it.
I usually prefer discrete circuits over “shields” (boards that go over an Arduino/Raspberry Pi/etc.) because they are simpler, cheaper and more fun/educational to build; but I found an inexpensive and convenient shield containing the relay and all needed electronics.
I measured the current/voltage when the button was pressed, but forgot to write it down for the post. But it was well within what the relay shield can handle.
There isn’t any schematics this time: just soldered the shield pins over the ESP pins. The relay has three pins: the common (C), the normally closed (NC) and the normally open (NO). In order to “press” the wall unlock button with the relay, we have to connect the C and NO pins to its terminals. But before that…
Software
It’s easier to test before you stick things to the wall. Once again I used ESPHome within Home Assistant. This time we want to present the relay as a push button, so something like this does the job:
switch:
  - platform: gpio
    name: "Front door"
    id: "front_door"
    pin: GPIO5
    on_turn_on:
    - delay: 4s
    - switch.turn_off: front_door
    icon: "mdi:door"
The relay is configured by GPIO5 pin, and the on_turn_on section is what makes it behave as a push button: it doesn’t matter what turns it on in Home Assistant (user interface, automations, etc), it will turn itself off automatically after the specified interval (4 seconds). During that time, the electric lock buzzes, signaling the visitor that they can enter.
Putting it on the wall
 Once you write ESPHome to the board with the configuration above, you can add that switch to any card on the “Overview” page (if your Home Assistant isn’t set up to automatically add new switches). When you click/touch the virtual button to turn it on, you should hear a “click” on the relay, and, after 4s, another “click” as the virtual button returns to the “off” position.
Using the conductivity test on a multimeter, double-check that the “NC” and middle pin only connect when the button is pressed. Those pins are the ones you should connect to the doorbell button, without disconnecting the wires already there (so the manual button continues to work).
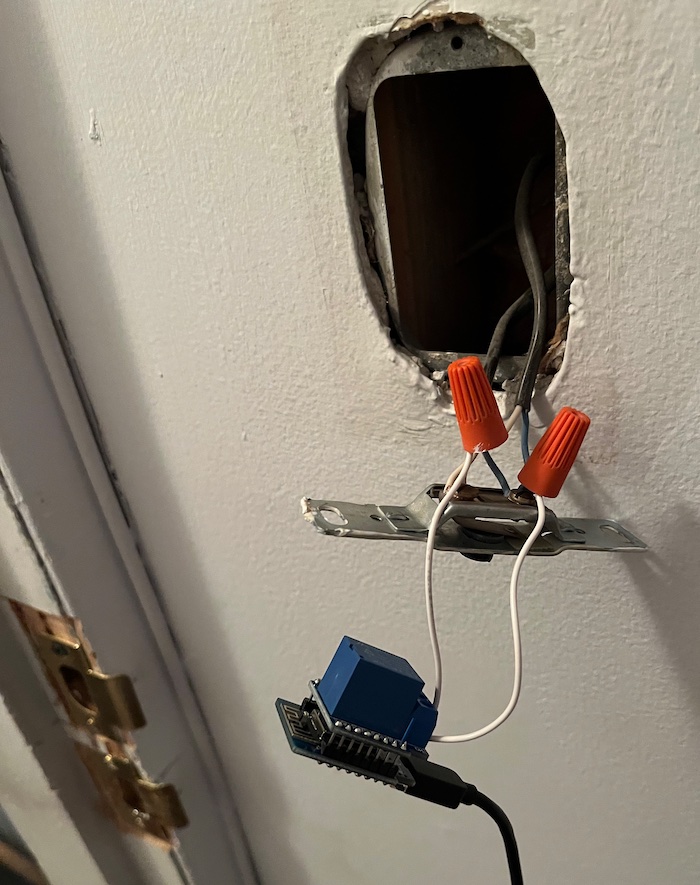
There was plenty of space on the wall for the ESP8266 and the relay shield, so I just stuck them there, wrapping all the metal parts with electrical tape to avoid short circuits. Could use a case, but that was good enough.
You’ll need to supply power to the ESP8266. This time I didn’t have an outlet nearby, but there was some leftover coaxial cable from the older cable installation (the landlord even offered to remove that cabling, since the current provider comes from a different place altogether). It isn’t the most appropriate cable for USB power, but it is already there, and it works.
Automations
Now the sky is the limit. I could, for example, just unlock the door from any automation by adding an action like this (no need to turn the switch off, as the configuration above does that automatically):
action:
  - service: switch.turn_on
    target:
      entity_id: switch.porta_da_casa
I actually did a more complex setup: since I also have a smart lock controlled by Home Assistant on the internal door, I created an “I’m home” button on the UI that unlocks both the front and the internal door (which can even be linked to Siri/Google Assistant/etc. so I can just say “Hey Siri, I’m Home” and enter).
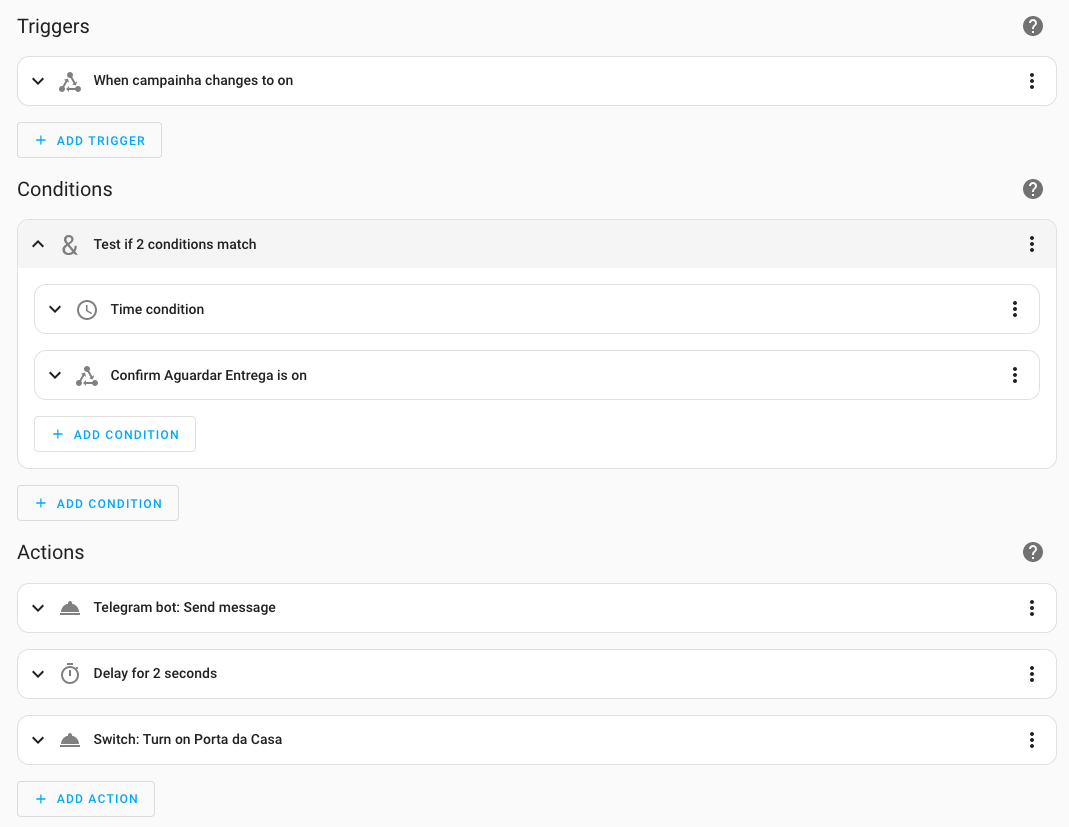
I’ve also created an “incoming delivery” switch that I can turn on when I’m expecting a delivery, and it will unlock just the front door when the doorbell rings (but only during daytime):
I’m considering to hook this Mail and Packages Integration to automatically turn on that switch in days I’m expecting a delivery, but I first need to ensure it works with the emails sent by Canadian retailers. In any case, this setup is pretty robust and easy to customize, all done for a ridiculously low price. I’m pretty happy with it!