One day I decided to install an alternative firmware on my NETGEAR N600 in order to tweak lower-level settings and try to minimize frequent (and very frustrating) disconnections on Splatoon. But the setup failed, effectively bricking the router.
“No sweat”, I thought, “let me just put it into some sort of recovery mode and flash the original firmware into it”. For this router, the idea would be to transfer the firmware via TFTP - which works by setting up a computer with fixed TCP/IP configs and starting the transfer at the right time during the boot process.
That didn’t work either.
At that point, I realized this fix would require some physical hacking.
The idea was to connect a computer to the router via serial port and run some lower-level commands to restore the old firmware. But there was a catch: almost any decent router has a serial port, but very few have a serial port connector. To make the connection, I’d have to open the device and hook the computer’s serial port to the router motherboard pins that contain the serial port signals (TX/RX/GND).
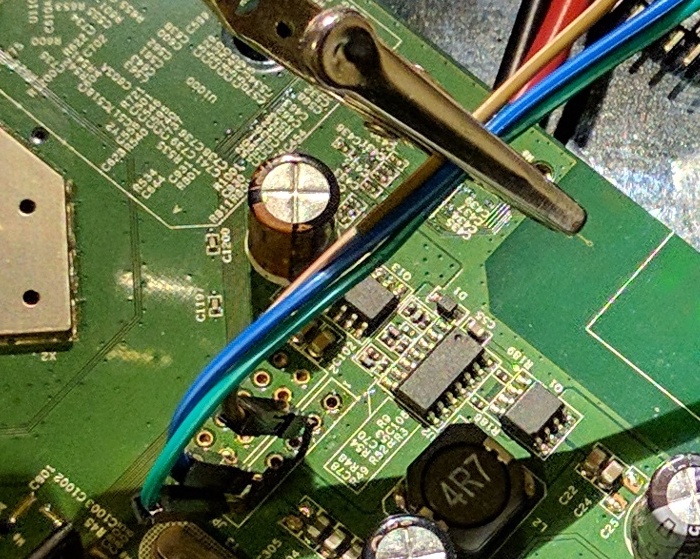
To make things even worse, mine doesn’t have the pins, but just the holes on the board where they should be. Gee, thanks, Netgear! Tried soldering a header, but there was some gunk in one of the pins that I could not melt (they really don’t want to make it easy), so I had to precariously keep them in place with a soldering “third hand”.
Since each revision of the board has a slightly different pinout, I needed some multimeter peeking + trial-and-error to find the correct pin layout. Mine is the v3 and here is the setup that worked (green/6 = GND, blue/5 = RX, brown/2 = TX):
Router connection solved, now to the computer side. Computers these days don’t have serial ports - and even if they did, traditional (RS232) serial connectors are electrically incompatible with onboard serial circuits (TTL). Here are two possible workarounds:
- Use a Raspberry Pi by configuring a pair of GPIO pins to operate as a TTL serial device;
- Get a cheap TTL-level USB-to-serial converter and plug it into any computer.
In any case, once you set up your terminal emulaton software with the proper parameters (115200/8/N/1), it should operate as a console to the router, so when you turn it on, you will see the boot messages of its Linux-based operating system:
Decompressing..........done
Decompressing..........done


CFE for WNDR3700v3 version: v1.0.6
Build Date: Wed May 18 17:25:10 CST 2011
Init Arena
Init Devs.
Boot partition size = 262144(0x40000)
Found an ST compatible serial flash with 128 64KB blocks; total size 8MB
et0: Broadcom BCM47XX 10/100/1000 Mbps Ethernet Controller 2010.09.30.0
CPU type 0x19740: 480MHz
Tot mem: 65536 KBytes

Device eth0:  hwaddr 2C-B0-5D-44-1A-1C, ipaddr 192.168.1.1, mask 255.255.255.0
        gateway not set, nameserver not set
Loader:raw Filesys:tftp Dev:eth0 File:192.168.1.2:vmlinuz Options:(null)
Loading: Failed.
Could not load 192.168.1.2:vmlinuz: Timeout occured
too long file.
LZMA boot failed
Loader:raw Filesys:raw Dev:flash0.os File: Options:(null)
Loading: .. 5192 bytes read
Entry at 0x80001000
Closing network.
Starting program at 0x80001000
Linux version 2.6.22.19 (root@tomato) (gcc version 4.2.4) #22 Mon Dec 5 07:45:34
 CET 2016
CPU revision is: 00019740
(snipped - full output here)
eth0: Broadcom BCM47XX 10/100/1000 Mbps Ethernet Controller 5.110.27.20012
wl_module_init: passivemode set to 0x0
eth1: Broadcom BCM4329 802.11 Wireless Controller 5.110.27.20012
PCI: Enabling device 0000:01:01.0 (0000 -> 0002)
eth2: Broadcom BCM4331 802.11 Wireless Controller 5.110.27.20012
/ #
This shows Tomato (the custom firmware) is booting up (and possibly failing at some point), and we can see the TFTP daemon starting as well. I tried to use the output as guidance to do the timed TFTP trick, yet with no result. Having a root-y # prompt at the end allowed me to fool around a bit, but not to properly start the tftp daemon or change anything much useful.
I was about to give up, but this page shows the trick: during boot, you can quickly press Ctrl+C and get to a Common Firmware Enviroment CFE> prompt:
Decompressing..........done
Decompressing..........done


CFE for WNDR3700v3 version: v1.0.6
Build Date: Wed May 18 17:25:10 CST 2011
Init Arena
Init Devs.
Boot partition size = 262144(0x40000)
Found an ST compatible serial flash with 128 64KB blocks; total size 8MB
et0: Broadcom BCM47XX 10/100/1000 Mbps Ethernet Controller 2010.09.30.0
CPU type 0x19740: 480MHz
Tot mem: 65536 KBytes

Device eth0:  hwaddr 2C-B0-5D-44-1A-1C, ipaddr 192.168.1.1, mask 255.255.255.0
        gateway not set, nameserver not set
Startup canceled
CFE> ^C
CFE> ^C
CFE> ^C
CFE> ^C
CFE>
That shell allowed me to start tftpd manually. That instance would not time out, allowing the proper transfer of the firmware:
CFE> tftpd
Start TFTP server
Reading :: Done. 7258170 bytes read
Programming...done. 7258170 bytes written
Write len/chksum offset @ 0x006FFFF8...done.
Decompressing..........done
Once that process was finished, a reboot brought my router back to life, with the original system’s boot message:
Linux version 2.6.22 (lawrence@foxconncpe2) (gcc version 4.2.3) #8 Sat Dec 14 13
:13:11 CST 2013
The full output of the original firmware suggests the CFE is not overwritten when a new firmware is flashed - meaning it will always be there as a last resource.
Of course, figuring all this took me a very long time. In the meantime, I had to get a new router, and I picked the LinkSys WRT3200ACM - a spiritual descendant of the WRT54G series that started the custom router firmware frenzy. Its beefed-up wireless specs guarantee consistent Splatoon matches. But it was quite fun to get “old” router back in working shape - and I learned a ton on the process!
Comments
James Smith
To anyone who owns this router the 3700 v3 I recommend using DD-WRT. Its not hard to go from factory to dd-wrt if you upload this file first from the netgear factory firmware.
ftp://ftp.dd-wrt.com/betas/...
Then wait for it to program and reboot. IT will take about 4 minutes or so before you can access the router setup page at 192.168.1.1 it will make you change the user name and password.
Then to get the latest build that works for this you will need to upload this one here.
This one give USB NAS support.
ftp://ftp.dd-wrt.com/betas/... then wait again about 4 to 5 minutes. Then setup your wifi password and other things you want.
There is 2 more newer releases that came out at the time of this writing. They both suffer a reboot loop in which you have to serial connect like its shown here to restore it. I heard of Tomato firmware but never used it.
Andrew
Tomato firmware is great in general; unfortunately, there is no working version for the 3700 V3. Even worse, there *IS* a version that one of the developers compiled and released that, in fact, will BRICK your router (as Chester and I have both learned to our regret). I am now trying to follow Chester's instructions to de-brick my router (my PC board is a different rev than his - haven't got the connections right yet). I don't really need to do this; the 3700 V3 router cost me almost nothing and I have a whole pile of spares, but I want to learn how to do this.
I did try DD-WRT on the 3700 V3 before I foolishly tried the Tomato version and bricked it. I've used DD-WRT in the past and have found it has a lot of features but also is radically inconsistent and unpredictable between routers; some features simply don't work, others are poorly documented or difficult to use. Tomato, when you get it working on a router that has a working version, is much more consistent and reliable, so if you get something to work on one router with Tomato, it seems to work with the others.
If I ever get my 3700 V3 debricked, I'm going to try OpenWRT next on it.
Andrew
I finally got my 3700 V3 debricked. I used the same method as Chester (thanks, Chester! This helped a lot.). However, even though I definitely have the V3 version of this router (Broadcom chipset), my PC board is very different than the one in Chester's picture, and that threw me off. Although I have that same 6-pin connector (or rather, 6 holes where a connector would go) as Chester's board, much else is different; my 6-pin connector is labeled J14. I tried connecting to those same holes as Chester did with no luck.
I finally found after some more googling that the four "pads" (labeled JP1) next to the 6-pin J14 are the connector I needed. There are no holes; you simply solder pins or wires on top of each pad. It should be much easier, actually, to solder to those pads than Chester had to do with those tiny holes.
By trial and error, I figured out the pin assignments of JP1 (these pins aren't numbered on the board, but I am numbering them thus: where pin 1 is closest to the outside edge of the board, pin 4 is closest to the inside):
1. RXD 2. TXD 3. GND 4. VCC
Connect 1/RXD to the TXD pin on your serial port, and connect 2/TXD to the RXD pin on your serial port. Connect 3/GND to GND. Don't connect 4/VCC. So you have to solder only three pins to the top of the board.
I bought my little USB serial port off eBay for 99 cents from a place in Hong Kong - took less than two weeks to get to me by mail. It came with the cables as well - very handy.
James Smith
On my Netgear the pinout was 6 was ground 5 was either TX or RX and pin 2 was either RX or TX. I got the adapters with the wires attached. There was four colors and it was Black on 6 White on 5 and green on 2. No need to use the Red or VCC wire with it. I also helped a guy in Canada unbrick his unit he got for $2.50 on ebay and someone flashed Tomato on it and bricked it.
As for the DD-wrt they have messed something up something really bad after release r33215 the next 4 newer releases will either brick the router or the router will refuse to flash it. As for R33215 its been stable. I do not use the QoS service or VPN options. But the USB port works and wifi signals work and it does not reboot or crash at random. OpenWrt may work for you. I never used it yet but you always have my personally tested firmware links if OpenWrt does not work well for you. To be honest anything is better than the stock Netgear firmware.
James Smith
Oh I see you got a different revision which has the same version number but the board layout is different. I believe there was one where you can do the pin short method to force recovery mode. Since you figured out the serial pinout and got Putty to work which is much safer. It looks like you got a pile of them to recover right? They will serve you well. Perhaps flash dd-wrt on one of them to try it out.
Andrew
Yes, I have a different board layout; even though I have that same 6 pin connector as you and Chester have on my board, the connections didn't work, but the 4 pin connector next to it did.
I don't have other routers to recover - and this is the only WNDR3700 I have at all. The others are just various spare routers, great for little projects like wireless ethernet bridges (connect your desktop PC to your WiFi without wires, without a separate wireless card). Most of my spares already have Tomato. It's really much more stable and reliable and easier to use than DD-WRT, which I used for a few years prior to discovering Tomato. Unfortunately, Tomato is targeted at fewer hardware platforms, so it's just not an option for a lot of other routers.
I did try OpenWRT briefly on this WNDR3700v3, but it looks a bit raw, so I put it aside for now. I'd like to get one little function working in DD-WRT with it but can't figure it out just now. A project for another day...
James Smith
Whats the function you need that you can't figure out in DD-wrt?
Andrew
VLAN tagging on the WAN. Works in Tomato if your hardware supports it. Not even sure this one does. DD-WRT support for it is spotty and not standard - may work with some hardware, not others.
Albert
Cab I use CP2102 or PL2303HX? What cables did you use
chesterbr
Sure. I could swear I used a CP2102, but the Dealextreme link is unreliable (goes to another product), and my drawer only has a JY-R2T V13... ¯\_(ツ)_/¯ Anyway, any serial/ttl to USB adaptor that your computer recognizes will do.
I likely used solderless breadboard jumper cables like these: https://core-electronics.co... , but anything that you can attach (or solder, although you won't want to solder on a one-off use like this) will work.
Albert
Thanks for your reply. I have another question. Is it really nessesary to soldering the pins to get it work? Can't I just put some pins there and connect the cables and then use Putty and bring up the command ?
chesterbr
No, soldering is not needed - in fact, I'd recommend against it if your board allows you to just make contact, because it's likely a one-off thing - once you get back to a working firmware with proper TFTP, you won't need the TTY setup anymore.
Albert
Cool. Last question. I'm about to order this: https://www.electrokit.com/... and this pins https://www.conrad.se/p/te-... this should be enough? :) I also need to find a screwdriver that opens up the case x)
chesterbr
Looks like so, but maybe you want to open the case and confirm your board indeed is like mine before purchasing anything (other than the screwdriver :-D )? I mean, maybe yours already has pins, or something different...
Albert
Hello. Im lucky. A guy discovered this and it worked for me https://www.linksysinfo.org... // https://www.linksysinfo.org...
chesterbr
ah, good to hear! I have tried that on mine, but unfortunately, TFTP was busted (I confirmed it was the problem because, after the complicated procedure, TFTP worked normally). Glad you don't have to go through that (although it _is_ fun to use TTY on a less-inaccessible port :-D ). All the best, and thanks for sharing!
Albert
No it’s not the same method as tftp! This method worked on my bricked v3 when i flashed to latest freshtomato! I plugged my pc to the switch and the router to the switch and run the nmrpflash with command and it worked!
chesterbr
Ah yeah, I had thought that on a cursory read. But I gave it the proper attention now. Thanks for sharing!
remy
I fixed one today that I had laying around. The only thing different on mine was I reversed tx and rx pins to get it to work. The console did not work the first time until I reversed the pins. Tried uploading some pictures but this disquss thing is trash.
chesterbr
Oh, good to hear. Wonder if that is a variation on the router model or on the serial port on the computer end; but glad you figured out the inversion.
And indeed, Disqus isn’t as good as it was when I added it (and also adds too many ads);; going to replace with something else as soon as I figure out how to migrate existing content.