RFID + NFC = NExT implant
NFC (the tech used in mobile phones for contactless payments and contact exchanges) and RFID (used in product identification/tracking, building access cards and many other things) are found everywhere these days. I played a little bit with cheap tags that can be used to interact with phones, but implants are getting more practical, so I decided to give one of them a go!
(I know, I know: technically, NFC “is” RFID - or, specifically, is a set of protocols built upon a subset of the RFID ones, but I’m going with the commonplace usage of the terms: “RFID” for the unregulated “low frequency” 120-150 kHz tags that use all sorts of proprietary protocols, “NFC” for the “high frequency” 13.56 Mhz devices using specifically NFC)
I didn’t want to limit myself to a single technology (or to go with two implants), but Dangerous Things (yes, that’s the company name 😅) sells the NExT: an implant with both an RFID chip (that can simulate - or “clone” - fobs and tags on the wild) and an NFC chip (which can store 888 bytes of data, accessible to any NFC reader I touch, including smartphones).
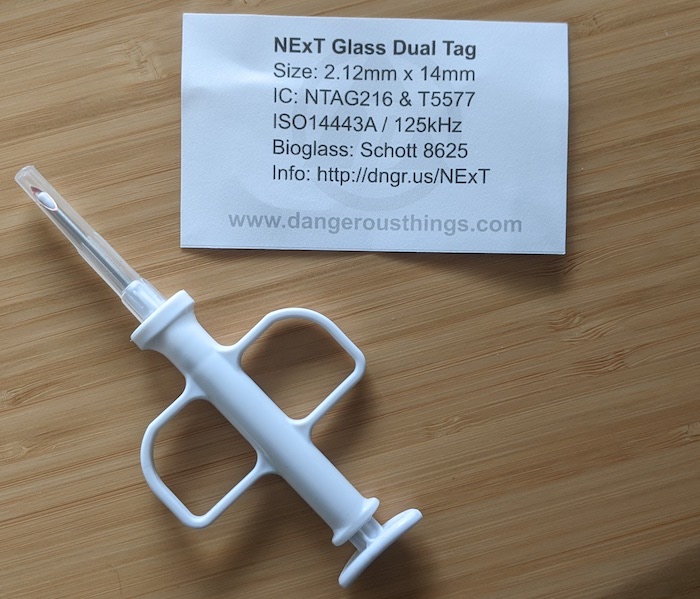
There are some limitations: its NFC can’t be used for payments (like, for example, the Walletmor), and the RFID can’t emulate super advanced security, or hold multiple tags, but the combination is enough for a lot of uses, plus it’s a field-tested set of chips that should be operational for years and years, so I chose it.
The implant process
Now that I knew what implant I wanted, the issue was how to get it implanted. Being quite afraid of something going wrong, I would prefer to get a physician to do it, but I didn’t feel like bothering my family doctor with an elective procedure during a pandemic.
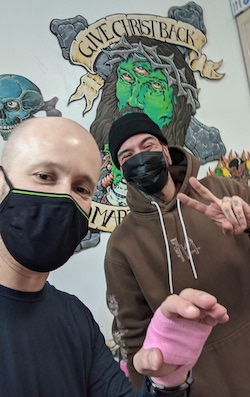
After some digging, I found the installation partners section on the Dangerous Things website, which led me to Midway Tattoo and Piercing, a studio in Kensington (where else?), Toronto where Matt Graziano kindly gave me a quote and scheduled a date.
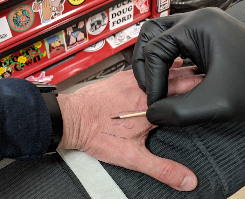
I won’t lie: I was quite afraid, but Matt - a biohacker himself who was quite excited with his (literally) shiny xSIID NFC + LED implant - put me at ease. The entire procedure took a couple minutes, and honestly, was nearly painless (just a bit of blood). I even managed to film it with the other hand:
I’m a cyborg, here is my card
The beauty of NExT is flexibility: its high-frequency NTAG216 chip allows me to store several different classes of data (not unlike, say, a QR code) and have it accessed by any NFC-enabled phones when I touch them at the right spot, and it’s the easiest thing to do, so I tried it first.
There are several Android and iOS apps that allow writing NFC data to the chip; I already had NFC Tools PRO, so I used it to store a Linktree address, turning my hand into a virtual business card:
@chesterbr I am now a #cyborg 😁 #bodymodification #nfc #chipimplant #electronics ♬ original sound - Chester
Hacking actual buildings
The URL sending thing was fun (although NFC support in phones on the wild is hit-and-miss, at least here in Canada), but the other part of the dual chip (the low-frequency T5577) allows some other interesting applications, including the one I really wanted: getting rid of building access “fobs”.
Contrary to the NTAG216 (which can be programmed with any smartphone with NFC), specialized hardware is needed to read the fobs and write them on the T5577. My kit came with the Proxmark 3 Easy, a somwewhat outdated member of the Proxmark platform of open-source RFID hacking tools, but very useful nonetheless for reading, writing and cracking several types of RFID devices.
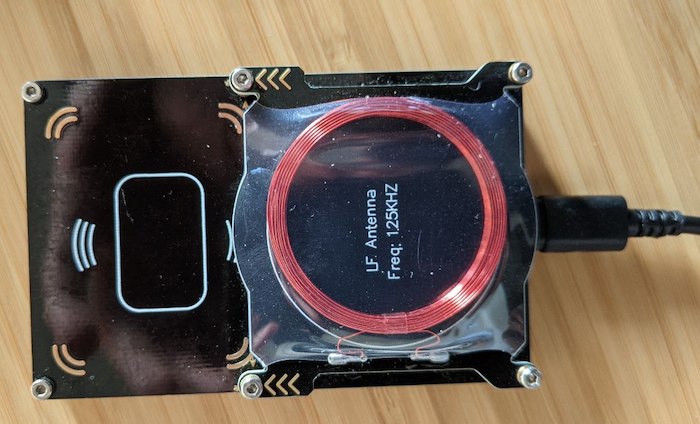
Using it requires a client on your computer and a matching firmware on the board. There are several builds of those around - my board came with an old version of “Iceman”, one of the most feature-complete builds, but in a really old version. Updating it requires downloading and compiling the client and firmware as a set.
EDIT: previously this required some file editing; now you just follow the instructions to get the dependencies (e.g., these for macOS), then make as usual.
Any errors here can be fixed with web searching (for example, I had to do a small fix to my Homebrew-installed openssl). When that is done, it’s a good idea to start by upgrading the board’s bootloader with ./pm3-flash-bootrom. It requires putting the board into bootloader mode, by pressing its single button while plugging to the computer. My version was so old that I had to keep it pressed through the process, otherwise it was quick and easy.
Once the bootloader is on a decent version, the same process (plugging the board while pressing the button, but now you can release it) can be used to update the firmware, just now running ./pm3-flash-fullimage.
With the board fully updated, typing ./pm3 invokes the client - which will detect the board, connect to it, and that’s where the fun begins!
These videos go a long way showing how to navigate the client menus; the most useful commands I learned are lf search and hf search, that try to read things on the LF (RFID) and HF (NFC) antennas, respectively. If they identify a tag, they will suggest further commands.
In my case, the command identified the tag as a Kantech ioProx, which also uses a chip from the T55xx family and had no particular advanced protection. Yours is likely to be different, so do an image search to confirm you identified it correctly.
These tags are identified with a number in the format XSF(XX)YY:CN, where XX is the “version”, YY is the “facility” and CN is the “card number”. These are important because they are the parameters for the command that will reprogram the implant (or some other T55xx card/tag) to behave just like the tag, effectively “cloning” it.
With the right numbers in hand, you can use lf io clone --vn xx --fn yy --cn CN (xx and yy are the XX and YY from above, converted to decimal) to write the tag to the implant. Of course, other manufacturers/models of tags will require different commands (this is for the iOProx, hence the io), but the overall process is the same.
Just be careful and notice the version and facility numbers are hexadecimal - they need to be converted to decimal before applying. I topped that with also writing the original fob (they are often writable!) with the wrong info; getting both hand and fob rejected by the building on the first attempt 🤦♂️.
Fortunately I keep a long scrollback on my terminal, so I was able to figure out the change and fix the mess. Lesson learned: save the info returned by lf search - in particular, the [+] IO Prox - XSF(XX)YY:ZZZZZ, Raw: NNNNNNNNNNNNNNNN (ok) line. The last number is a composition of the others, so you can use it to verify the tag.
Anyway, with that sorted out, I was able to record the implant with the correct information, and then access my building just with my bare hand~s~:
@chesterbr Used a Proxmark 3 Easy to copy the building fob to the NExT chip in my hand #biohacking #RFID #NFC #dangerousthings ♬ original sound - Chester
Other applications
That was all cool, yet feels like I just scratched the surface on what can be done with this dual chip implant. My bundle included (among other things) these cool hacking tools:
- xEM Access Controller is a board that memorizes fobs (including the implant) and can trigger your own hardware to build an an access management system or anything else.
- KBR1 is a module that “types” any RFID tag’s id on a computer, Raspberry Pi or anything that recognizes a USB keyboard; could be used for a more software-based access control system.
- RFID diagnostic card can identify tag readers as low frequency (LF) or high frequency (HF), so you know which chip to use.
I am tempted to use some of this stuff to to open my apartment’s door (since I already have an electronic lock securely linked to a Home Assistant-controlled Raspberry Pi), but I am not sure how safe that would be (building fobs are ridiculously easy to copy, as seen above). On the other hand 🥁, it’s not like a regular key can’t be trivially copied too. Have to think about it.
Should I do it?
The idea of upgrading one’s body with cybernetic parts is mesmerizing, I must admit. Surely, I’m not lifting cars like The Six Million Dollar Man, but mine didn’t cost anywhere near that mark (which, to be fair, would be more like 34 Million these days), and I’m having my share of fun with it.
Anyway, RFID readers and fob cards/stickers/rings can be bought online, and are cheaper and less risky than and implant - but those can always be lost, so it’s your call. Implant or no implant, one thing is ture: there is a lot of fun to be had with NFC and RFID!
Comments
Alan Assis
Gostaria de solicitar a opção de escolher no perfil do parceiro. Por exemplo: mais moderado ou mais agressivo.
Outra opção bateria a gente ver as cartas do parceiro e definir a estratégia de jogo, pois não sabemos a estratégia do software.
Obrigado
chesterbr
Imagino que você esteja falando do miniTruco, né? Eu preciso revisitar esse software; muitas coisas (inclusive o maior controle sobre o bot parceiro) pode melhorar; obrigado!