Bani noticed this winter would be one of the best to see the northern lights in this decade. Granted, there are lots of places in Canada for that, but we decided for a stretch and went to Iceland. Adding a flight leg to the UK was cost-effective, and I threw in a train hop into France, ending up with a mix of Icelandic natural landscapes and urban highlights of London and Paris - two iconic cities I always wanted to visit!
Day Job - A Story of Chasing Dreams
There is no shortage of documentaries about startups, and that is understandable: the idea of bootstraping an idea into a viable enterprise is fascinating, and the reality is filled with real-life sweat, joy and drama that owes nothing to fiction.
Given that, I jumped at the opportunity of watching the premiere of Day Job, which puts under a microscope the journey of three companies through one of the Extreme Startups accelerator programs. Between the tight schedules and limited budgets, an interesting story ensures. Check the trailer:
How realistic? Well, after the event we had the opportunity of watching a Q&A with the film’s director and the three entrepreneurs, which pretty much backed the film depiction. It is yet unclear how/when the movie will be distributed, but I’d keep an eye if I had not already seen it.

Dollar Shave Club: A Test Drive
I hate shaving. I really hate it.
The only reason I shave is because I’m not much fond of facial hair either. And I’ve tried every single facial hair removal alternative, such as laser (hint: does not work for light-colored hair) and wax (requires growing a beard before each session, pretty much defeating the purpose; also hurts on a par with passing a kidney stone or wisdom teeth extraction).
Now you know why anyhthing with the slightest potential of making shaving suck a bit less grabs my attention - not that Dollar Shave Club’s unorthodox presentation needs any help in that regard. If you don’t know what I’m talking about (or just want to laugh again), here is their presentation video:
For “$1” a month, they will send you enough blades to allow a weekly replacement. Of course, that does not include shipping (adds $2/mo), and refers to the very basic model, the “Humble Twin”. Also, that is the price in the US - in Canada it gets 50c more expensive, and you pay in Canadian dollars.
Still, CAD 3.50 is an awesome deal for a month’s worth of shaving - you can only get that with fixed-head disposables (the kind that is unlikely to be “f***ing great”, as Mike puts it), so I decided to give them a spin. Being a Gillete Fusion Power user, I was tempted to go straight to “4x” (their 4-blade model) or even “Executive” (a 6-blade mammoth reminescent of MADtv’s Spishak Mach 20), but I wanted to test the real Dollar Shave, so I went with the Humble Twin.
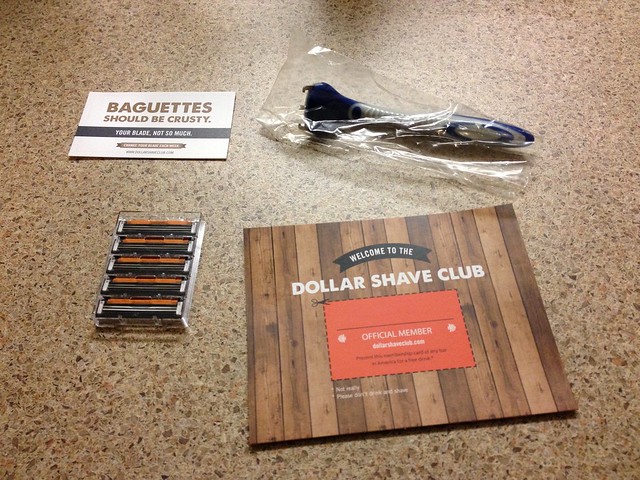
The package arrived with a separate razor and its set of 5 cartridges. The razor is pretty decent: comfortable grip, flexible head (my biggest issue with disposables) and a firm pressure-connection system, complete with eject button. It also included a couple of lame joke cards, not nearly as fun as the video.
After shaving a few days with it, I won’t say it is as good as the vibrating, 4-blade Fusion Power, but the difference was really small: with an extra pass I got the same results, which is much more than I could say of other 2-blade systems I’ve tried. Since they let you upgrade/downgrade your plan at any time (changing the future billing/delivery), I upped the ante and switched to the 4x, for CAD 6.50 a month - still below the Fusion price.
The switch process was easy, although I had to enter my credit card information again (apparently they need to do a new authorization, and the website confusingly warns that, for all effects, you are stopping the previous plan and starting a new one). But it worked fine - at the time I’d be receiveing a new set of 2-blade cartridges, I got a 4-blade set (with 1 less cartridge, but I suppose they last more), a new razor compatible with them, and another set of not-really-funny cards.

Once again I was positively surprised: it is nearly as good as the Fusion. The difference is small enough to be shadowed by the convenience/price, and the freshness of a new blade every week or so might even make the average shaving slightly better than with the Fusion, whose steep price makes me swap less often.
Disclosure: I get a free month if you buy it through my link, which would raise suspicion - if the blades weren’t so dirt cheap to begin with. That said, my veredict: I did not find it as f***ing great as Mike does, but they are very good, and having a fresh one every week without any effort is a huge benefit for such a low price. With the ease of switching plans and the promise of equally easy cancellation, it is worth a shot.
Dragon Ball Z: Kami to Kami (Battle of Gods)

It is not a secret to anyone how much of a Dragon Ball nerd I used to be. I collected the manga (having read it quite a few times) and watched the anime religiously, although I did not enjoy the post-manga material (Dragon Ball GT and the “TV specials”) that much. Granted, I did watch it, but those always felt like something was missing. Akira Toriyama (original manga writer/artist) not being much involved on their production surely played a role.
Well, things has changed: thanks to Nick van Vugt, I have just watched Dragon Ball Z: Kami to Kami (Battle of Gods), and I REALLY, REALLY enjoyed it! Every single element of the series is there, bringing all the joy from the classic: I laughed, I got thrilled, I got embarassed. Just like the old days (with a bit of modern animation here and there).
Announced as as the first “really canon” DBZ movie, it has a good share of Toriyama participation: he came up with the new characters’ backgrounds and designs, steering what would have been another higher-order-of-power-magnitude-but-heartless-guy into a way more interesting character that blends in with the existing cast as few of the new ones in TV specials or GT did.
The story happens in the 10-year hiatus between Z and GT (or, manga-wise, between the end of Majin Boo saga and the epilogue). Won’t give any spoilers - it suffices to say that adding canon to this precise time frame brings its share of inconsistencies with the non-manga material. One can bet it will bring Dragon Ball nerds (in particular GT haters) countless hours of fun figuring out and discussing possible explanations.
Unfortunatelly, it seems that nothing short of summoning Shenlong would bring it to Canadian theathers. This time, Brazilians hit jackpot: it will be on the big screen in October 18, with the voices from the original Brazilian dub. If you live in Brazil and enjoyed Dragon Ball Z, you owe yourself a ticket for this one!
TEDxToronto 2013
I had the great opportunity of attending TEDxToronto 2013, the 5th edition of this independently organized TED event in the city, and my my second TEDx (the first being TEDxUSP 2010 in São Paulo). Held at the Koerner Hall, it was carefully organized around the theme “The Choices We Make”.

A great selection of speakers made this edition a huge success - I honestly could not find a single disappointing talk (and I was not the only one). The artistic performances had a strong local appeal, making them a bit harder to grasp for newcomers like me. But the audience really enjoyed, so I guess it is all about living a few more years in this lovely city.
If I had to choose a favorite talk, I’d be torn between Darrell Bricker (former Director of Research for Canada’s Prime Minister and CEO of a leading social research firm), who presented a novel perspective of the country’s economics and demographics, fully backed by statistics and census data; and Mark Bowden, who impressed the audience with a live demonstration on the impact of body language on public acceptance.
It is interesting how a few of those presentations interact: Mark makes a point in how those visual cues are an important part of communication and how social engagement can be improved by them, even though they might be cast as lies - and it was just after Debbie Berlin-Romalis talked about how her work with terminal children with cancer taught her that telling the truth is the core component of dealing with such a delicate matter.

There was no shortage of sad stories, such as Ti-Anna Wang’s life as an advocate for Chinese dissident families (including her injustly imprisioned father) and Mark Henick’s pledge for mental health care backed by a vivid portrait of clinical depression. On the other hand, seeing Dr. Ivar Mendez connecting on-stage to the remote presence robots he and his coleagues use to bring medical care to remote communities in Canada and Bolivia brought happiness back to everyone’s souls.
Overall, the talks brought a great perspective on how a person’s choices can impact the lives of so many others, and one can’t help but think about his/her choices in the same light. Talks should be available soon (“this October”, says the official Twitter account) can be watched online, and here are some photos as well.
Toronto Mini Maker Faire 2013
It amazes me how some publications become avatars for specific cultural movements. For example, I can’t think about the (pre-internet) BBS hacking scene without an image of 2600: The Hacker Quarterly, nor I could dissociate the formative years of the geek generation from WIRED (of which I was an avid reader and even occasional subscriber, despite its price in Brazil.)
The community of do-it-yourself electronics/robotics/material hackers that call themselves makers have a clear representant in Make: magazine, and one of the publication’s staples is organizing the Maker Faire. Self-described as “the greatest show (and tell) on earth — a family-friendly festival of invention, creativity and resourcefulness, and a celebration of the Maker movement”, it spread into local events such as the Toronto Mini Maker Faire, which I attended today.

It is a very entry-level/family event. The appeal is mostly for those who have never seen or heard about, say, 3D printers or Arduinos. In addition, it is also extremely focused on children. All activities and a great deal of the exibitions targeted younger audiences and those who have no previous exposure to this kind of thing.
Of course it doesn’t mean older and more experienced geeks should stay away, as there are lots of activities in different areas. I was eager to have some fun at lock picking table, but it was too crowded. To make things worse, the rain pretty much packed everyone inside of Whychwood Barns, demanding quite some patience for the most sought-after activities. Maybe next time.

The highlight that made my ticket worth its price was Brian Luptak’s talk on his 3D Printed Chocolate experiment. I (mistakenly) thought it was pretty much a simple replacing of injected plastic with some sort of chocolate goo, but the science and labor involved in making it work are quite complex and interesting. We could not see the machine in action (or try the chocolate, which “tastes really good”, in his words) because the laser used is not appropriate for non-lab environments, but the hardware and some of the chocolate was on display.
There is space for organizational improvement: the lack of a second microphone made it impossible even for speakers to listen to audience questions (and there were many). There was only a single TV screen - I was lucky/wise enough to get a good spot, but I’m sure lots of people could not see the slides at all. It beats me how people that can hack such complicated technologies could not solve these mundane problems.

Anyway, if you believe science and family go together, I highly recommend facing the drizzle and checking out the second (and last) day. Tickets can be purchased online or at the event, and a couple of hours should be enough to see all the tables and engage in one or two activities. Talks are very short (20 min), so it’s worth checking the talk schedule as well. And, of course, make a lot of stuff afterwards!
Going from WordPress to Octopress

I could not express enough gratitude to the WordPress developers for offering the world a free, open-source, professional-quality blogging platform. Being based on a LAMP stack means it can be hosted pretty much anywhere with very limited resources, giving me freedom to change hosting services without any impact. Having a powerful admin panel, hundreds of plugins and being open to change means you can do pretty much anything with it.
One thing that I never liked, however, is the dynamic aspect: whenever you request a post, Wordpress has to retrieve information from a database, mingle it with HTML templates, call plugin code, build the page and then serve it. Surely, there are good caching plugins to alleviate the burden, but that is never as fast as plain old HTML. It also means there is software running on the server, which needs to be patched and catered.
Octopress has a more “back-to-the-basics” proposal: instead of running on your server, the software runs on your computer. Whenever you need to publish a new post, it generates the HTML pages for the whole site, then updates anything that changes. It is not a new approach, but its twist is that it uses tools that are familiar to modern web development, such as git and Markdown.
The big challenge was migrating 12 years of blog posts from Wordpress (some of them already migrated from other platforms and containing multiple flavors of horrible HTML). Octopress’ built-in migration wasn’t up to the task, but Ben Balter’s WordPress to Jekyll Exporter did the trick - you just install it on your Wordpress, run the export and copy the result to the source folder. Done.
Of course I had to manually fix lots of small things - for example, all my YouTube/SlideShare embeds were broken, because they are based on <iframe> tags, which were not imported. But that is what weekends are for, and I am very happy with the final result.
Things like Twitter/Facebook/Google Analytics integration are already baked in - you only need to enter your credentials on the config file. Others (such as Facebook OpenGraph) can be easily added to the simple template structure. There are already a few themes available, but I found that some color adjustments on the standard one gave me a pleasant look - not to mention lots of improvements that were desperately needed on my former HTML, like responsive design and less blocking JavaScript.
There is still a lot to fix (such as automating minification/joining of scripts and styles), but I am amazed by the performance improvement, the convenience of using GitHub as storage and the abscence of security hassles. It is definitely not for the general public (you have to do lots of things manually, making a blogging service like Blogger or an easy-to-use software like WordPress more suitable for such an audience), but if you like to hack and feel comfortable with an Unix shell, git and plain text editors, Octopress is the way to go!
UPDATE: Forgot to mention that it won’t handle comments. But it is easy to migrate them to Disqus (as usual, a WordPress plugin will do the trick), then just add the Disqus ID to the Octopress config file. Easy!
Should GMail blacklist spam senders?
My friend FZero said today on Facebook:
Dear GMail: when I mark something as spam, you should BLOCK that email address from ever sending me anything again.
and my answer got a bit too long for Facebook, so here it is:
[TL;DR: Statistics say it would not work well for everyone, but might work for you, but Google is about large data sets, not (directly) about you, so if you want it, hack the planet!]
I’m not really up-to-date on the subject, but let’s assume the core of what GMail does behind the scenes is still a well-balanced “naive” Bayesian probabilistic approach for “spam/unsure/ham” classification (possibly fine-tuned by Google’s secret sauce of massive data analytics).
I remember (but can’t find right now) follow-ups to Paul Graham’s original work (which kickstarted the technique from a statistical indicator into a “99%+” efficient spam filtering technique) pointing to data/reproducible experiments suggesting that most “field knowledge” applied to the data sets (like, for example, bumping the significance of the From email address) of specific email tokens did not improve the efficiency metrics, and in several cases did indeed decrease efficiency.
However, a core point was that the inclusion of headers both in the both the database scoring and the composed score for each message (along with careful tuning of token identification to improve token database hit ratio) *did* improve the efficiency of the classification, so there *may* be some gain into applying unequivocal domain knowledge into the *classification* (i.e., doing exaclty what you say), as long as it doesn’t update the token scores with such blacklisted e-mail bodies (to avoid aforementioned performance decreases) *and* the blacklisted-to-normal spam messages frequency is low enough that their removal from the process does not decrease significantly the corpus of analyzed messages.
To add (yet) more opinionated guesswork, I’d say that Google products in general tend to lean more towards deriving behavior from large data set analysis rather than gut feeling, so I think it is very unlikely they will consider the suggestion. Would not surprise me, however, if they haven’t already A/B tested that (and every other algorithmic variation under the sun).
But I’ll finish this random rumble with at least one assertive comment: you could do it on your own by creating a blacklist filter – in fact, maybe a browser plugin (or something talking to the API? never looked it to omuch) could trick the spam button into also adding the sender to such a filter. Looks like an interesting hack to try…
Powering a Raspberry Pi
The Raspberry Pi is powered through an standard micro-USB conector. That is great, since it allows you to use pretty much any phone charger you got lying around. Or at least one that supplies 700mA of current (maybe a bit more if you plug extra USB stuff on the Pi).
I thought I had it covered with my iPad charger and its juicy 2.1A, but the video below shows that voltage also plays a role (and that the iPad charger doesn’t really deliver in that respect):
USB specs say you should have 5V ± 0.25V from a source, and the Pi also expects that, so I bought a $9 KDL-5100A at my electronics parts supplier. It is physically identical to the FY0501000 linked on the video, and indeed, performed better than the iPad charger… but still below 4.75.
After some head-scratching, I found the issue: the cable. Apparently, cheap cables have quite some resistance, which causes voltage drops as you need more current (Ohm’s Law, I suppose). Replaced it with a Samsung one, and voilà: iPad charger got almost good, and new charger worked great.
An LG cable (with no Part number) got me pretty much the same results. Also tested the cable on an Apple Cinema Display USB port (okay) and a BlackBerry Playbook charger with built-in cable (excellent). Heard good things about the Kindle Fire charger, but could not test it yet.

Guess who was causing trouble?
Below is a wrap-up of my measurements (Wi-Fi and keyboard dongles plugged); recommended options in bold. In short: get a proper charger, avoid $1 cables and always measure.
| Charger | Cable | Power (V) |
|---|---|---|
| Apple A1357 | Cheap unbranded | 4.16 – 4.56 |
| Apple A1357 | Samsung APCBU10BBECSTD | ~4.75 |
| KDL-5100A | Cheap unbranded | 4.65 – 4.75 |
| Cinema Display USB Port | Samsung APCBU10BBECSTD | 4.75 – 4.81 |
| KDL-5100A | Samsung APCBU10BBECSTD | 4.90 – 4.95 |
| BlackBerry HDW-34724-001 | built-in | 4.99 – 5.01 |
CLARIFICATION: The video above is not mine. It was just the inspiration for my own measurements, so I included it for illustration purposes.
A step-by-step guide to configure encrypted Time Machine backups over a non-(Time Capsule) network share
Time Machine is a wonderful piece of software, in no small part for following Mac OS X’s philosophy of simplifying common tasks, but allowing advanced users to go “under the hood”. My issue: I wanted to back up to a hard disk shared by this nice router, and I also wanted encryption.

The best Time Machines are designed in California.
Unfortunately, Time Machine won’t do network backups except on Apple Time Capsule, most likely due to its reliance on Unix hard links, which typical Windows (SMB/CIFS)/FAT device based networks (like mine) won’t do. Filesystem-based encryption is also a no-no. And even if that worked, my other devices (such as my XBMC-powered Raspberry Pi) need open access to the files already shared.
Mac OS X sparse images (aka sparse bundles) to the rescue. They are just like the .dmg files you get when downloading Mac software from a website, but supporting all the goodies mentioned above (encryption and hard links) and a bonus: they auto-grow (to a specified limit) as they need more space. Time Machine is capable to use one of those – as long as you can trick it into that, which can be tricky.
I found some great articles online on how to create an sparse image, encrypt it and convince Time Machine to use it, and here is a step-by-step mix of their tips that worked for me:
Step 1: Naming the image
The image file name should contain your computer name and wi-fi address. To ensure that, open your Terminal and paste these commands:
MAC_ADDRESS=`ifconfig en0 | grep ether | awk '{print $2}' | sed 's/://g'`
SHARE_NAME=`scutil --get ComputerName`
IMG_NAME=${SHARE_NAME}_${MAC_ADDRESS}.sparsebundle
echo $IMG_NAME
If you read something like <name>_<hexdigits>.sparsebundle, you are good to go.
Step 2: Creating the image and encrpyting it
Before you paste/type the next block of Terminal voodoo, change the line MAXSIZE=750g to the maximum size you want the sparse image to grow (after that, Time Machine will delete older backups, as usual), .e.g: MAXSIZE=300g. Use the same Terminal window from step 1, as this code depends on the name generated there.
MAXSIZE=750g
hdiutil create -size $MAXSIZE -type SPARSEBUNDLE -nospotlight -volname "Backup of $SHARE_NAME" -fs "Case-sensitive Journaled HFS+" -verbose unencrypted_$IMG_NAME
hdiutil convert -format UDSB -o "$IMG_NAME" -encryption AES-128 "unencrypted_$IMG_NAME"
rm -Rf "unencrypted_$IMG_NAME"
You will be asked for a password (I’d recommend a passphrase, but it’s up to you), and the sparse image file will be on your home folder.
Do not double click/open it yet.
Step 3: Asking Time Machine to play nice
Open Finder and move the image from your home directory to the network share (or copy and delete the original). Now double-click to mount it, enter the password and the “Backup of YourComputerName” should appear on finder. Hooray – except that Time Machine won’t allow you to select it.
We’ll need to force its hand with this last block of commands (yet on that same Terminal window):
defaults write com.apple.systempreferences TMShowUnsupportedNetworkVolumes 1
sudo tmutil setdestination "/Volumes/Backup of $SHARE_NAME"
Enter your Mac user’s password when prompted, and when you open Time Machine preferences, you’ll see “Backup of your_computer_name” configured as the backup volume. As long as it is mounted, it should work with Time Machine just like an USB HD.
Caveat
As with standard Time Machine backups, these can be accessed by any Mac, as long as you have the volume password. I’m not sure, however, whether they can be used for a full restore on a new machine (probably yes if you do the first and third steps, but did not test that far).
Personally, I’m not much of a fan of doing full restore on a different machine/OS version. Although I’ve seen it work, I’d rather start from scratch, copying files from the latest backup of the old computer on a need-to basis. If you think otherwise, this solution may not be the best for you.
UPDATE: This was tested in Mac OS X versions 10.7.5 and 10.8.3. Older versions might work as long as they support encrypted bundles, but I’m not really sure. Let me know on comments below if it does not work for you (and what happened).